 |
| Princess Estelia Rocking her Mace Photogragh taken by Ludre Photography |
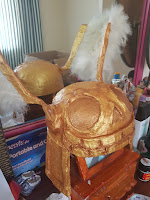
Despite the fact that I burned my fingers with hot glue numerous times, and nearly died from allergies making the wings, this is probably my best work so far.
And now that I've actually proven to myself that paper mache helmets can come out looking decent, I have decided to create an paper mache version of Nel tu's Arrancar mask.
Another perk is that the helmet is unlikely to slip off when you bend, and you will have bend unless you want to drag off any low lying decorations or products vendor have hanging around their stalls at your event.
The only downside to this helmet is that when it is coupled with your wig, it makes your head get very hot. You do, unfortunately, block any airways in the base cap by covering it with the mache so your head will unable to release its heat. But, the good news is that you can remove the helmet every now and then without destroying the look completely.
The emoji's are not difficult to make at all, and do not take a lot of time to create either. I actually made them alongside my helmet, switching between the two periodically.

Materials Required
Round CapThick Cardboard
Newspaper
Glue Gun and Glue
Flour Paste with dishwasher soap
x2 Feather Fans (preferably plastic)
Gold Craft Paint
Brown Paint
Craft Varnish
Wire Cutters
Step 1
 |
| Cut out four curved cardboard squares |
Remove any coverings and decorations from your cap if you can without damaging it.
Cut out four slightly curved squares from your cardboard. These will be your helmet's ear guards or pads.
Remember to leave a piece on the ear pads that you will use to glue it onto your cap.
 |
| Glue the squares to the inside of your cap |
Glue the rims onto the each of the remaining ear pads.
Glue your ear pads onto the inside of your cap.
Remember that the ear pads are supposed to curved toward the front of your helmet
Step 2
 |
| Cut out 4 cardboard circles and glue them together |
Cut out eight circles. I feel I made my emoji medallions too small, so feel free to make them bigger if that is your preference.
Make four circles slightly smaller by trimming the edges.
Cut out the eye sockets and noses holes in the four smaller circles and carve out the smiles.
Cut out four tongues from you scrap cardboard and glue them onto the mouths.
Glue the emoji faces onto the larger circles.
 |
| Cover your emoji medallion in paper mache |
Step 3
Cover your medallions in a few coats of paper mache.Remove any access around the eye sockets and noses and paste it along the eye socket rims.
Leave to dry.
Step 4
 |
| Cover your helmet in paper mache |
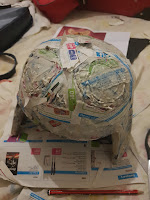
Cover your entire helmet in a layer of paper mache.
 |
| Shape the helmet eyes and nose |
Add a few more layers of paper mache around the top and start shaping the helmet's eye sockets and nose.
Carve out any access paper mache in the eye socket and nose and paste it along the socket and nose rim to give them more depth.
 |
| Remove access paper mache |
Step 5
 |
| Cut out two circles and the mouth |
 |
| Glue the shapes onto the helmet |
Cut out two more circles from your cardboard.
Stick them on either side of your helmet.
Cut out an the mouth from your cardboard and stick this along the bottom edge of your helmet.
Carve out the teeth.
Step 6
 |
| Line up your fan strips and glue 2 strips either side in an obtuse angle |
Take a feather fan and remove the metal nail connecting the fan strips together with your wire cutters.
Separate the fan strips from each other into pairs, except for four strips; these will be single strips.
Carefully remove all the feathers from these four of the fan strips.
Line nine pairs of the fan strips in ascending order.
Glue one of your individual, featherless fan strips over the nine paired strips.
Carefully turn the strips over when dry and glue another individual strip onto the paired strips.
 |
| Remove the access |
Glue the remaining individual, featherless strips one either side of the paired strips at an obtuse angle.
Using a sharp scissors, carefully cut the access strips inside and outside the obtuse angle, so that only the feathered ends remain.
 |
| Cover up visible strips and gaps |
If necessary secure any loose strips with your glue gun to complete the angel wings.
Glue on any access feathers to cover up any visible plastic strips and gaps.
Repeat this step with the second fan.
Step 7
 |
| Attach the wings to your helmet |
Glue these ends down once you have inserted them.
 |
| Cover mouth and wings in paper mache |
Leave for a couple of days.
Cover the mouth, circles and wings in paper mache.
Carve out the detail of the mouth while your mache is still wet.
Add detail to the helmet by place circles around the eyes with thick flour paste.
I didn't have enough space so I only added my circles above the eye sockets.
Leave to dry.
Step 8
 |
| Paint your helmet |
 |
| Paint your emoji medallions |
Paint your helmet and emoji medallions with gold craft paint. If you're using acrylic metallic gold paint, you might need to use white as a base coat first to keep the newspaper print from showing through the gold.
Do not forget to paint the inside of of your ear pads as well.
 |
| Add detail to emoji medallions |
 |
| Add detail to helmet |
Mix the gold paint with dark brown and apply it to the eye sockets, nose and mouth on the helmet and medallions.
Add shadowing and detail using the same colour along the helmet's ear pads, wings, eye sockets and mouth using a semi dry brush.
Leave to dry.
Add a few coats craft varnish to the helmet and emoji medallions and leave to dry.
Thus ends my blog series for Rayman Legends: Princess Estelia Cosplay, if you would like to see the budget breakdown for this cosplay click here and if you would like the step-by-step tutorial for creating her Skeletal Mace, click here.


