Showing posts with label Hollow. Show all posts

Thursday, 24 May 2018

Create Nel tu's Arrancar Mask in One Day!

Tier Haribel, Ichigo and Nel tu at Geekfest 2018
The perfectionist in me is strongly advising you that this project would be best suited if created over the course of at least a week, but it will concur that your Bleach: Nel tu Arrancar Mask can, in fact, be created in one day. 
So if you have, like me, been swapped with work and studies, so much so that you're too exhausted and demotivated to start and finish your masterpiece in time, then it is probably the best project to do on the fly.
I had actually given up on making the paper mache version of Nel's  Arrancar Mask in time for Geekfest 2018 on Saturday, the 19th May, but I was lucky enough to be given the day off that Friday; and apparently having less weight on my head and more neck mobility trumps playing Fallout 4 all day.
You will, however, need at least 12 hours or more of your time solely dedicated to crafting this project, therefore 6pm the night before your event is probably not the best time to start, unless you want to forgo sleeping and not give the mask the chance to dry and set overnight.
You might also want to have a fan heater, or a plain fan if you are not going through the winter season, ready to assist with drying your mask out faster as you build on it.
Word of warning with using heated air and copious amounts of flour paste as the combination does tend to breed bacteria, which will delay the drying time and make your project smell really weird. So use your paste sparingly if you don't have the time to rectify this problem. I, luckily, didn't encounter this problem with my mask, but it did happen with my Rayman Legends: Princess Estelia Skeletal Mace.
Should this happen to your project and you don't the time to scrape the afflicted area off your project and redo it, carefully paint over it if you can. That surprisingly stopped the bacterial growth, took the smell away and the area managed to dry out normally.


Materials Required

Sailor's Cap: bought at Hillfox China Mall for R35
Devil Horns Headband: can be bought at a China Mall, however there were none found at the Hillfox China Mall. These were given to me by a coworker.
Glue Gun and Glue
Masking Tape
Flour Paste mixed with bit of Dishwasher.
Newspaper
Cardboard
Craft Paint, Black and White
Ultimate Crafts Liquid Drops 3D Pearls - Pewter - Bought from Takealot for R29
Heat Resistant Craft Varnish


Step 1

Remove any decorations from your cap
Remove any unnecessary decorations and attachments from your cap if possible without damaging it.
Cut out 8 cardboard strips

Cut eight teeth shapes from your cardboard, the teeth will vary in size from the outer edges of the upper jaw to the its middle from small to large.
You might want to cut them slightly thinner and a tad shorter than my shapes, because I did end up removing two of the outer teeth due to my jaw line being too large in proportion to the rest of the mask.


Step 2

Glue your strips to your cap

Stick the teeth into the brim of your cap, using a glue gun.
Shape your teeth with mache

Build your teeth shape and definition by flour pasting newspaper in the central parts of your cardboard teeth.

Leave the outer rims of each tooth bare of mache.

If you can, have your fan on close by to assist with drying whenever you are not busy building onto your cap.


Step 3

Layer with mache and carve
out the eyes and nose

Coat the cap with a few layers of paper mache until you have reached your desired Arrancar mask thickness.

While wet, carve out your mask's eye sockets and nostril slits. Position any excess mache along the rims of the sockets and slits.

Even out the surface with extra layer of mache around the eyes and nose, if necessary.

Leave to dry.


Step 4

Create the horns from two
newspaper rolls
Remove the horn tips from your devil horn headband.

Using masking tape, create two newspaper rolls.

Take one roll and cut it down to your desired horn size.

Snip off the corner of one end.

Tape your horn tip onto the other end (the unsnipped end) of your roll.

Curve the roll into the shape of a ram horn and tape where necessary to keep the horn's shape.

Repeat with the second roll.


Step 5

Paste the horns to your mask
You will only want continue with this step when the sides of your mask has dried and hardened enough or else your mache layers will begin to separate from the cap as you stick the horns to them.
Layer the horns with mache

Starting with the top part of your horn, glue it down along the sides of your mask.
Slip your finger into the snipped end to assist in setting the horn in place as the glue dries.

Layer and build on the horns with mache.

Leave to dry.


Step 6

Create the ridges along
the horns


Using your 3D paint, create the circular ridges along the length of both horns.

Leave to dry.


Step 7

Paint your mask
Paint your eyes and nose


Using your Black Craft Paint, paint the eye sockets and nostril slits.

Leave to dry.

Using your White Craft Paint, paint the entire mask.

Leave to dry.


Step 8

Finally, coat your mask with Heat Resistant Craft Varnish.

Leave to dry and then apply a second layer of varnish.

Leave overnight to dry.

Now don, go out into the world and find your Nnoitra Gilga to irk with life lessons!
Coat with craft varnish
You can find out what my budget breakdown for my Nel tu Cosplay and how to create Gamzuza, her Zanpukuto by clicking the relevant links as well.

Wednesday, 26 April 2017

Creating Gamuza, the Zanpukuto


If you want a fully functional Gamuza, short of it being able to sever limbs off, paper mache is the material to use for this project. 
My material choice was a last resort though, since my efforts in attempting to mold the grip from clay ended up in a complete and total disaster, aesthetically and functionally. 
Thinking back now, it was probably for the best; my zapukuto was light and I didn't have to be as careful about handling it as I was with my Arrancar mask.
Word of advice, you may want to make an additional velcro attachment from black material to latch your sword onto your costume's belt in order for the zanpukuto to hang at the side of your thigh instead of under your arm. Something I should have done because the hilt did tend to get in my way during the Fantasy Fayre 2017.

How to Craft Nel tu's Zanpukuto, Gamuza

The first thing you'll need is do is map out Gamuza's size dimensions before getting started. I got most its dimensions from a store online that sells the real deal, and guessed the rest based on what made the most sense to those dimensions. These are the measurements I used:

  • Overall Length: 102 cm
  • Blade Length: 68 cm
  • Blade Width: 3 cm
  • Blade Thickness: 4 mm
  • Hilt Length: 28 cm
  • Guard Length: 9 cm

Materials required:

  • Newspaper
  • Thick Cardboard
  • Pritt Glue
  • Dala Craft Paint (Black, White, Yellow, Blue)
  • Deco-Varnish Heat Resistant
  • Paint Brushes
  • Flour Paste with a few drops of Dish Washing Liquid
  • Paint Palette

Building The Bones.

Once you have your dimensions down, you can start sketching out the different parts of the zanpukuto onto your cardboard to create the skeleton around which you will shape Gamuza.

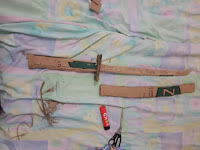
Compiled Gamuza Cardboard Skeleton


Step 1: The Blade

Wood cut out of
zanpukuto blades
I was actually quite fortunate to have my friend, who isn't afraid to risk losing some fingers, saw out Gamuza's blade from an old kiddies blackboard for me. But, I did make a cardboard version of the blade, just in case the blade would be to heavy for the hilt to hold up.
Blade Cardboard Cut Outs


Cut out two 68 cm x 3 cm, slight curved, blade pieces out of cardboard.
Remove of 1 centimeter along the entire outer edge on one of your blade pieces. Then, cut that piece longitudinally, down the middle, in half.


Glue the half pieces onto both sides of your other blade piece. This should define the sharp edge of the blade and give it a little more thickness.


Step 2: The Sheath

Sheath pieces: Full pieces
and Hollow pieces

Cut out five 70 cm x 5 cm, slightly curved pieces from your cardboard. Trace your blade into the middle of three of these cardboard pieces a cut them out, keep the outer pieces.
Stick hollow pieces together


Glue the Hollow pieces together so you end up with one thick Hollow sheath piece


Glue the Hollow pieces along the edges of your 2 remaining Full pieces, then stick the extra blade cut outs in the center of both sides of your Full pieces to complete your sheath skeleton.


Step 3: The Hilt


Cut out two 28 cm x 4 cm cardboard pieces, remember to add 3 cm x 3 cm centered extension on top of these pieces. This extension is important in that it will join your blade and guard to your hilt.
Cut out two 28 cm x 3 cm cardboard pieces.

Cut out two 28 cm x 2 cm cardboard pieces.

Glue the 28 cm x 2 cm in centers of your two 28 cm x 3 cm pieces and then glue these pieces in the center on both sides of your 28 cm x 4 cm pieces.


Glue your two 28 cm x 4 cm together. Do not stick the 3 cm x 3 cm extension to each other.

Step 4: The Guard


Like the Zanpukuto of the soul reapers, Arrancar zanpukuto are entirely unique to each arrancar, so this will be an important stage for you to get right if nothing else.
Nel tu's guard is shaped like two inter-locking mirror images of the letter D to me and I used that as a guideline to sketch and cut out four 9 cm x 5 cm cardboard pieces.

Cut a 3 cm slit in the center of all  four pieces and then hollow out two pieces into the mirror image D's.

Glue these hollowed pieces into the Full pieces and then glue the Full pieces together.


Putting Flesh to Bone: Shaping Gamuza

Now comes the messy bit, and fun if you inclined towards it. I, personally, find I have little patience for paper mache; sticking small bits of paper to something one by one frustrates me to no end. But I had to admit to myself that the end result was worth all that mental pain.

Step 5


Using the your flour paste as glue, cover the hilt, blade, guard and sheath with newspaper until it has a rounder shape.
Remember to define the pommel at the end of your hilt, the mirror image D's on both sides of your guard and about 1 cm of the entrance of your sheath by making them slightly more thicker then the rest of the area.
Leave to dry.

To create the woven detail on the hilt, fold a few pieces of newspaper into zigzags and stick them onto both sides of your hilt. Squish the middle of each zigzag together and leave to dry.


Step 6


Once your Zanpukuto parts have dried, use flour paste with a thicker consistency to coat your hilt, guard, blade and sheathe.

You may need to leave this dry before adding the detailing of Gamuza, such as the outer edging of the Guard, the woven work and pommel of the hilt, and along the top entrance of your sheathe, with your flour paste.

Leave to dry, more importantly, leave to dry in a safe place. The dishwasher addition in the flour paste may protect your project from bugs, but will not prevent your dog from using your Zanpukuto parts as a chew toy. RIP my former guard piece; your loss still brings a tear of frustration to mine eye.

Compile your Zanpukuto once it has dried, you may need to use super glue for this step if you have some lying around.

Repair any cracks or damage and add any additional detailing with your flour paste.

Painting the Skin

I decided it would be best if I bought only the primary colours (red, yellow, blue) along with black and white to save myself some money; whatever additional colours I would need I could get by mixing two or more five colours together.

Step 7


Mix black and white paint onto to a paint palette, if you have one, or an old saucer. You need to add very little black and a whole lot of white to get a silvery colour.
Once you have the colour you want, paint the entire Zanpukuto silver as well as the top entry part of your sheath.
Leave to dry

Add a bit more white to the paint mix and paint the sharp edges of your blade a lighter silver.

If you wanted to, you can add a bit more black to the paint mix to better define the detailing on your guard, pommel, and the piece connecting your hilt and guard to your blade.

Leave to Dry


Mix your yellow and blue paint together to make green. You will need to use more yellow and a bit of blue in this case to get Gamuza's yucky Avocado Green colour.

Paint your sheathe and the woven detail on your hilt.

Leave to dry.

Add two coats of varnish and leave to dry to complete your Gamuza.


Thursday, 13 April 2017

Creating the Complete Nel tu Arrancar Mask

Nel tu and Harribel at the Fantasy Fayre 2017
Photograph taken by
JC Photo
Crafting the Arrancar Mask for my Nelliel tu Odelschwank cosplay from clay was a purely aesthetic choice. 
The end results I found on YouTube for the paper mache version looked horrendous to me, and I wanted Nel's mask to look as if it fell right out of the Bleach anime; fragile enough to crack and possibly, break under the blow of a Zanpukuto without detracting from its fearsome appearance. 

A Hollow is not a Hollow without its signature mask, so it is important that you get this aspect of your costume just right if nothing else. If you are worried that you may not be skilled with molding clay, try it out first using pieces kiddies play dough or opt in for the paper mache version. I knew I was at least halfway decent with molding it since my niece and nephew seem to love whatever I create from their play dough.

Word of advice though, your mask, once hardened, will be relatively heavy. Do not choose to make it from clay if you cannot handle some weight on your head for a few a hours; and ONLY a few hours.

How to Craft Nel tu's Arrancar Mask

Before running off to buy your crafting material for this project, you will have decide which type of clay that you would like to use, Air Hardening Modelling Clay or Oven Bake Modelling Clay (Polymer Clay). I chose the Air Hardening option because 1) I didn't want to risk burning my house down, and 2) I would not be able correct any possible mistakes, mishaps or cracks on the mask while it bakes.
Once you decided which is better for your skill and time frame (air hardening will take longer) you can get started.

Materials Required:

  • Dala Craft Paint: White and Black.
  • Dala 577 Flat Pure Bristle Paint Brushes.
  • Dala Deco-Varnish: Heat Resistant 
  • x2 Jovi Air-Hard Modelling Clay - White 1kg
  • A Large Bowl
  • Plastic Bag
  • A Steak Knife or Clay Modelling Tools
  • Newspaper
  • Flour paste and dish-washing liquid.
  • Fabric Elastic Band
If you need a budget breakdown of and the store that sells some of these materials, please check out my blog post Cosplaying Nelliel tu Odelschwanck. You might also need to keep a picture of Nel tu close by to determine if you're sticking to the general shape and dimension of her mask throughout this process.


Step 1

Make sure the bowl you're using can fit around your head, and place it inside the plastic bag. This will prevent the clay from sticking to your bowl while it dries.
Open the first packet of clay and flatten it around the outside of the bowl. Molding the clay will end up making your hands white, this however, can be cleaned off easily with just soap and water.
Using the tip of your steak knife, carve away extra clay to shape the outer edges of mask.
Shape the snout and upper jaw.


Step 2


Carve out the eyes, nostrils and eight teeth. Try not to carve to deeply into the eyes because the thinner layer is liable to crack and break away when it dries.
Work quickly, but carefully during this stage because your clay will start to dry if left to stand.
Brush the pads of your thumbs across the area of the mask to smooth away any cuts, bumps or cracks.
Cut openings or slits into the edge of your mask's 'cheekbones' for the fabric elastic band.


Step 3

Open your second packet of clay and divide it equally in two. Keep the one piece in its packaging and not exposed to the open air.
Roll the clay piece into the shape of Nel's horn and blend it into and along the edges of your mask face, curving the horn inward.
Take your other piece of clay  and repeat.
Remember not to cover or clog to your elastic's holes with the horns.
Pinch out the horns ridges, these don't have to be shaped perfectly. In fact, I think the less perfect the ridges look the more realistic the horns will appear.
Place to dry for 24 to 48 hours. 
Be sure to check in on your mask every now and then during this time, in case one of your horns happen to fall off.


Step 4


Once your mask is dry enough to move without damaging it, carefully remove the bowl and its plastic covering.
The inside of your mask may still be wet, so turn it over and repair any gaps or cracks around the outer edges and horns.
If you can without damaging your mask, try thinning it by scraping out any access  wet clay, but stay away from the eye areas; they are thin enough.
Leave to dry for another 24 hours.


Step 5

Once it is dried completely, use a paint brush to coat the mask with a thin layer of water.Use this sparingly around the eye area.
This will give fill in any remaining or newly developed cracks and smooth out it appearance.
Leave to dry.


Step 6


If you can, now is the time to make any minor changes to the masks appearance. I ended up sawing a centimeter or so off of the teeth because they were too long.
Coat your entire mask with white paint and leave to dry.
Fill in the mask's eyes and nostrils with black paint and leave to dry.
Carefully, clean up any painting mishaps around the eyes and snout with white paint and leave to dry.
Apply 2 coats of Deco-varnish and leave to dry.


Step 7

Mix a flour paste together and add a few drops of dishwashing liquid. This was a trick I learned in school; the dishwashing liquid will prevent bugs from chewing on your project.
Create a 'cranial cap' on the inside of your mask from the newspaper and paste.
Careful not to block or clog your elastic holes and leave to dry.
Coat the cap in flour paste with a thicker consistency and leave to dry.


Step 8

Coat the 'cranial cap' with white paint and leave to dry.
Apply two coats of Deco-Varnish and leave to dry.


Step 9

Finally, tie your fabric elastic band securely to the mask and rock it at your next cosplay event.

Please share if you've found this blog post helpful. Leave a comment if would you like me to post a How To Tutorial for a paper mache version of Nel tu's Complete Arrancar Mask to find out which of the two (clay or paper) is aesthetically and functionally superior?

Watch out for my next post on how to create Gamuza, Nelliel's Zanpukuto.


Cosplaying Princess Bubblegum from Adventure Time

A Mage and Princess Bubblegum at the 2018 Fantasy Fayre - The Bestiary Photograph taken by Heinz Meier I must admit that I was slightl...